This page give some useful links and instruction on how to install software needed for the tutorials and how to login to the HPC & GPU node for the tutorial on MPI and CUDA.
You will be given a username and password for login to the HPC and GPU servers at the registration. We will be using Secure Shell (SSH) command to login to the system.
A general "Getting Started" on how to login to NARIT network via the gateway can be found on Chalawan website. The exact hostnames and ip addresses will be given during the tutorials due to the security reason. To prepare your laptop for running Secure Shell (SSH),
- For Linux machine, the remote access to the servers are the most straight forward using Secure Shell (SSH) on the terminal command line of your machine.
- For MacOS users, almost similar to the Linux case you could use your "Terminal" application to Secure Shell (SSH) into our server. However, you must make sure that SSH command is available on your machine. You can check this out by typing command "ssh" in the terminal and see the result. If no ssh command is found, you may want to install it using tools such as MacPorts or Homebrew.
- For Windows users, the easiest way is to install MobaXterm (with integrated and support for X-Window forwarding out of the box) the free Home Edition is sufficient for our workshop. A tool like Putty can also be used if preferred but there is no support for X-Window forwarding.
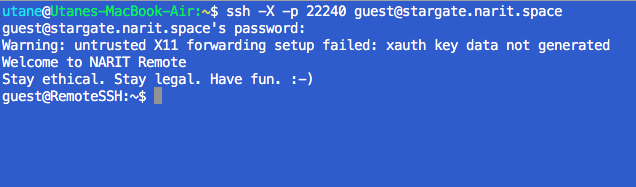
To login to NARIT network from outside, on your terminal (or putty or MobaXterm) issue the command
ssh -X -p 22240 guest@stargate.narit.space
You will then need to enter password. Please note that it is case sensitive and you will not see the cursor change as you enter the password. Once you finish typing the password just press enter. You should see something like the image below,
For MPI tutorial, we will use server with hostname "rigel1", so go ahead and issue a command (you do not need to enter any password at this step)
ssh -X guest@rigel1
Then change your working directory to /nfs/guest using cd /nfs/guest and create your own working directory with your name with mkdir /nfs/guest/YOUR_NAME
For CUDA tutorials, we will use server with hostname "pollux", so go ahead and issue a command (you do not need to enter any password at this step)
ssh -X guest@pollux
You will need to install 2 main applications on your laptop;
1) Python version 3.6
Packages required: numpy, scipy, astropy, matplotlib, cycler, kiwisolver, pyparsing, python-dateutil, pytz, six
How to install:
Depending on how familiar you are with the Python development environment
- If you are already working in Linux or Unix and have Python3.6 installed and managing its packages with pip3 or Linux distribution standard software manager, e.g. yum or apt, please feel free to continue using your current setup and ensure that you have the required packages (as listed above) installed for Python3.6.
- If you have not used Python before or not familiar with its development environment at all, we recommend using Anaconda (https://www.anaconda.com/download). Windows, Linux and MacOS are all supported. Step-by-step guides for installing Anaconda on Linux (Ubuntu) and for installing Python packages using Anaconda.
2) Octave (a free & open-source MATLAB alternative) version 4 or above
Packages required: octave-optim, octave-io, octave-statistics (when install using Octave command line prompt run the command "pkg install -forge package_name" where package_name is optim or io or statistics)
How to install: Octave Download website
Octave supports Linux, MacOS and Windows operating system. For Linux system, you may install using software manager such as yum or apt, depending on your Linux distribution. On MacOS, we recommend using MacPorts or Homebrew to install Octave.
Step-by-Step guide for installing Octave packages on MacOS (using Homebrew), Linux (Ubuntu) and MS Windows.